
Car Interior Cleaning Guide for Spotless Results in Texas
- Nov 17, 2025
- 6 min read
A spotless car interior does more than impress passengers. Studies show that a clean space can actually improve your mood and focus while driving. Many people underestimate how much dirt, dust, and clutter can build up in just a few weeks. Learning the right steps to clean your car inside and out makes the process easier, helps you avoid costly mistakes, and keeps your ride feeling fresh every time you slip behind the wheel.
Table of Contents
Quick Summary
Key Point | Explanation |
1. Gather proper cleaning supplies | Collect microfiber cloths, a vacuum with attachments, and surface-specific cleaners to prevent damage and ensure effectiveness. |
2. Declutter the vehicle thoroughly | Empty all personal items and trash from every compartment to create a clean slate for deep cleaning. |
3. Vacuum systematically | Use appropriate vacuum attachments to reach all areas, focusing on high-traffic zones and hidden spots to capture dirt. |
4. Clean according to material type | Use specific cleaning techniques and products for leather, vinyl, and fabrics to maintain their condition and appearance. |
5. Perform a detailed final inspection | Check for missed areas and use a microfiber cloth for touch-ups, ensuring every corner looks clean and refreshed. |
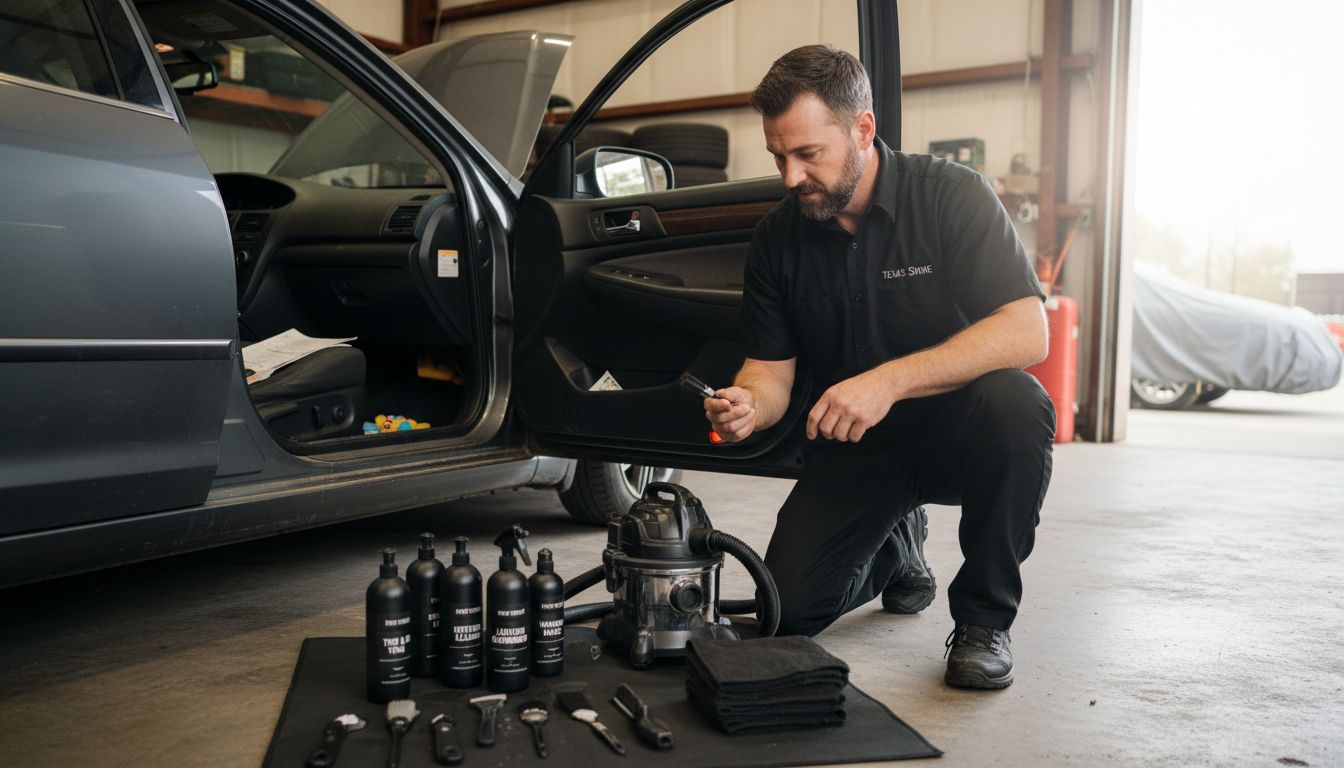
Step 1: Prepare Your Car and Gather Cleaning Supplies
Preparing for a thorough car interior cleaning starts with assembling the right tools and setting up a systematic approach. According to Consumer Reports, using automotive specific cleaning products is crucial to prevent potential damage to your vehicle’s interior surfaces.
First, gather your essential cleaning arsenal. You’ll want to collect microfiber cloths (which won’t scratch delicate surfaces), a powerful vacuum with multiple attachments, and specialized cleaning agents for different materials like leather, vinyl, and fabric. Motorist recommends choosing non greasy products that clean effectively without leaving residue or causing glare. Pro tip: Select cleaners specific to your car’s interior surfaces to ensure safe and effective cleaning.
Before diving in, remove all personal items trash and large debris from your vehicle. This preparatory step makes the deep cleaning process much smoother and allows you to focus on detailed cleaning rather than sorting through miscellaneous items. With your supplies ready and car prepped, you’re now set to transform your vehicle’s interior from dusty to sparkling clean.
Step 2: Remove Trash and Declutter All Interior Areas
Starting your car interior cleaning process requires a comprehensive decluttering approach. AARP recommends completely emptying your vehicle of all personal items and accumulated trash as the critical first step to ensure a thorough cleaning.
Begin by removing everything from your car including gym bags, work materials, water bottles, old receipts, and any random items that have accumulated over time. As Motorist suggests, a systematic decluttering helps identify areas needing special attention and creates a clean slate for deep cleaning. Check every compartment including the glove box, center console, door pockets, and underneath seats. Pro tip: Keep a small trash bag in your car moving forward to prevent future buildup and maintain a cleaner interior environment.
Once you have completely cleared out your vehicle, take a moment to sort items into keep, donate, and trash piles. This not only prepares your car for cleaning but also helps you organize your personal belongings. With a completely empty interior, you are now ready to move on to the detailed cleaning process.
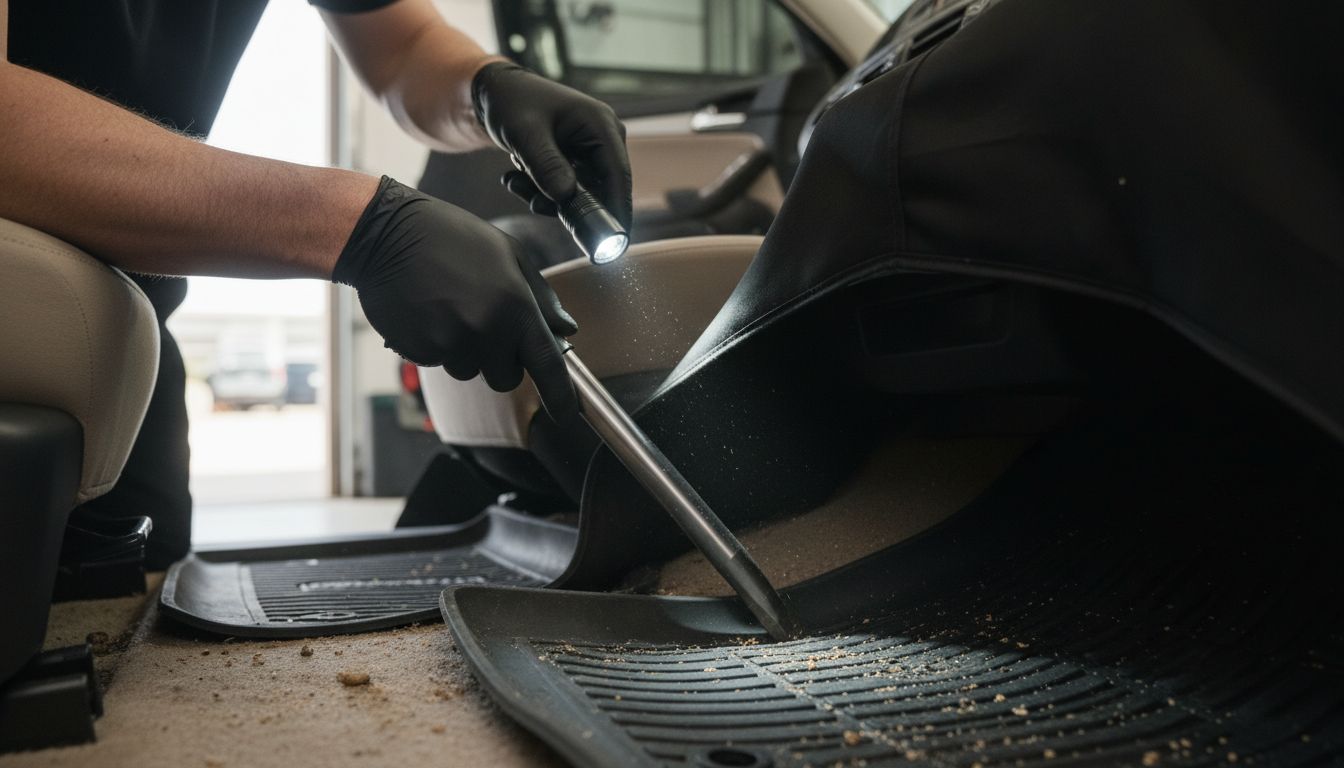
Step 3: Vacuum Seats, Floors, and Upholstery Thoroughly
Thoroughly vacuuming your car’s interior is crucial for removing embedded dirt and maintaining a clean environment. Consumer Reports recommends using a vacuum with specialized attachments to ensure comprehensive cleaning of seats, floors, and upholstery.
Start by selecting the right vacuum attachments for different surfaces. Use the upholstery tool for cloth seats and the crevice tool for tight spaces between seats, around the dashboard, and in hard-to-reach corners. Motorist emphasizes the importance of paying special attention to high-traffic areas where dirt and debris accumulate most quickly. Work methodically from top to bottom moving seat covers, lifting floor mats, and carefully vacuuming underneath seats to capture all hidden particles. Pro tip: Use slow, overlapping strokes to ensure you capture maximum dirt and prevent missing any spots.
Take your time during this process and be thorough. Move seats forward and backward to access hidden areas and use attachments to reach into tight spaces. For interior detailing insights, consider using a brush attachment for fabric surfaces to loosen stubborn dirt before vacuuming. After completing this step, your car’s interior will feel fresh and significantly cleaner.
Step 4: Clean and Treat Surfaces With Appropriate Products
Cleaning and protecting your car’s interior surfaces requires a strategic approach using the right products for each material. Consumer Reports recommends using specific cleaning techniques for different interior surfaces to prevent damage and maintain their appearance.
Begin with leather and vinyl surfaces by using a soft cloth dampened with a mild dish soap solution. Gently clean the surfaces using light circular motions, being careful not to saturate the material. For hard surfaces like dashboard vents and seams, use a soft toothbrush or paintbrush to remove dust and grime. Motorist emphasizes the importance of applying high-quality protective creams that shield surfaces from sun damage and prevent cracking. Pro tip: Always test cleaning products on a small inconspicuous area first to ensure they won’t cause discoloration or damage.
After cleaning, apply a specialized automotive leather conditioner to protect leather surfaces and maintain their suppleness. For detailing workflow insights, consider using microfiber cloths with alcohol for additional cleaning of hard surfaces. Your careful attention will help preserve your car’s interior and keep it looking fresh and well-maintained.
Step 5: Inspect Interior and Perform Final Touch-Ups
The final stage of car interior cleaning involves a meticulous review and refinement of your detailed work. Consumer Reports recommends conducting a comprehensive final inspection to ensure no area has been overlooked during the cleaning process.
Begin by carefully re-examining all surfaces you have already cleaned. Use good lighting to help identify any missed spots or areas requiring additional attention. Motorist suggests paying special attention to interior windows cleaning for enhanced visibility and overall appearance. Pro tip: Keep a microfiber cloth and detail spray handy to quickly address any remaining smudges or light dust. Use your phone’s flashlight to help highlight areas that might need extra cleaning by casting shadows and revealing overlooked dirt.
For interior detailing insights, consider doing a final re-vacuum to capture any dirt dislodged during your cleaning process. Take a step back and admire your work your car’s interior should now look refreshed and spotless. A thorough final inspection ensures you have not just cleaned but truly transformed your vehicle’s interior.
Keep Your Car Interior Spotless with Expert Care from Keep Clean ATX
Maintaining a pristine car interior can often feel overwhelming with all the dust, stubborn stains, and tricky surfaces to handle. This guide highlights the critical steps to remove clutter, vacuum thoroughly, and treat every material properly to keep your vehicle looking fresh. From leather conditioners to specialized cleaners, using the right products is key to protecting your interior and avoiding damage.
Take control of your car’s cleanliness today by exploring our premium range of Interior Care products tailored to tackle every cleaning challenge your vehicle faces. Ready to leave the hassle behind? Visit Keep Clean ATX now to book a professional detailing service or shop from our full lineup at All Products. Your spotless ride in Central Texas awaits with expert help just a click away.
Frequently Asked Questions
What cleaning supplies do I need for car interior cleaning?
Gather essentials like microfiber cloths, a vacuum with attachments, and specialized cleaning agents for different materials (e.g., leather, fabric, vinyl). Focus on products that are non-greasy to avoid residue, and ensure you have tools appropriate for the surfaces in your vehicle.
How do I properly declutter my car before cleaning?
Begin by removing all personal items, trash, and debris from your vehicle. Sort items into keep, donate, and trash categories to maintain an organized space and prevent future accumulation.
What is the best method for vacuuming my car’s interior?
Use a vacuum with specialized attachments to thoroughly clean seats, floors, and tight spaces. Aim for slow, overlapping strokes, and move seats forward and backward to ensure you capture all dirt and debris in hidden areas.
How do I clean leather and vinyl surfaces in my car?
Use a soft cloth dampened with a mild dish soap solution to gently clean leather and vinyl surfaces. Apply light circular motions to avoid saturation, and always test any cleaner on a small area first to check for discoloration.
What should I do after cleaning the car’s interior?
Inspect all surfaces for missed spots and perform additional cleaning if needed. Use a microfiber cloth and detail spray for any remaining smudges, ensuring your car’s interior looks truly spotless.
How often should I clean my car’s interior for best results?
Aim to clean your car’s interior at least once every three months to maintain a fresh environment. This regular upkeep can help reduce accumulated dirt and preserve surfaces over time.
Recommended


Comments